
it was my first quilting project, and so far has been my only large scale quilting project. however, i use the term "quilting" in the loosest possible sense. i mean, technically it IS quilted, but its way too easy to be real quilting (a craft which awes and terrifies me at the same time)
here is the basic instructions for a shaggy quilt. there is probably a more official name for these, but it looks shaggy to me. and maybe no one is interested in how to make their own, but just in case, i thought i'd share.
i made a throw that turned out roughly 49" x 63" but you could theoretically adjust the size by adding rows/columns of squares. i'm bad at numbers though, so you'll have to calculate the yardage for different sizes on your own.
start by getting 5/8 yard of 18 different fabrics. i used flannel, which greatly increases the snuggliness factor. you could use whatever you want, provided that it will fray. if finding 18 fabrics you like seems daunting, you could also get 1 and 1/4 yard of 9 fabrics. whatever floats your boat... its your blanket. you'll need a bunch of batting too, and some coordinating thread and such. a walking foot would probably be helpful but i'll be honest, back when i made this i didn't even know what a walking foot was and mine turned out fine so that's up to you.
once you have all your fabric, you will need to cut 64 squares that are 9" x 9" and 248 squares that are 5 & 1/2" x 5 & 1/2." if you don't have a quilter's ruler and rotary cutter, i highly recommend them at this point. the easiest way to do it is to by cutting one 9" strip and two 5 & 1/2" strips from each of the eighteen fabrics and then cut those into squares. (double the number of strips if you are only using 9 fabrics). from the batting you will need 32 squares that are 6 & 3/4" by 6 & 3/4" and 124 squares that are 3 & 1/4" by 3 & 1/4." i'm not going to lie. cutting the squares takes for-freaking-ever.
once you have everything cut, make little sandwiches with your fabric and batting. the fabric should be RIGHT SIDES OUT with the batting in the middle. in other words, lay one square down with the wrong side facing up and center a piece of batting in the middle (use the larger batting squares with the large fabric squares... obviously). then lay a second fabric square on top of the batting with the right side up. pin.
i suggest pinning allllllll of your square sandwiches together and then chain sewing. if you aren't familiar with chain sewing (i wasn't prior to this, but learned quickly) it means that you just sew one piece after another without cutting the thread so that when you are done you have a long chain of pieces that just need cut apart. you will be sewing diagonally from corner to corner, first one way, then the other to make an X. so chain sew them all in one direction, then cut them apart, switch and go the other direction. i marked where i was going to sew with a pencil just to make sure i actually made it to the opposite corner. if you feel brave, feel free to do without. in the end you'll have a little mini quilt that looks a bit like this... (or it would if you were quilting in MSPaint)
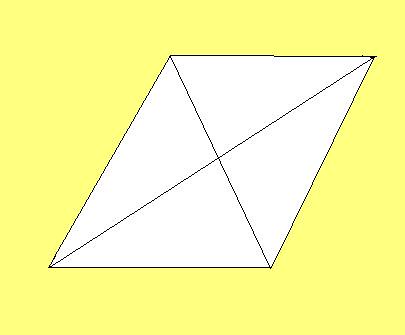 this is apparently an angled view.
not sure why i didn't just make it square...
once that's done, pair up your pairs to make a large square consisting of four small ones. when you pin them together, make sure that you put the sides WITHOUT the seam allowances together. you want all your seam allowances on the same side of the quilt.
now you should have 31 large squares made up of smaller squares, and 32 large single squares. at this point, you can lay them all out to be make sure you are happy with the color layout, or you can just wing it and keep sewing shit together. that was my approach and it turned out just fine, but again, its your blanket. it may help to lay them out before you pin them together, just to make sure you've got it right, but whether or not you stress over color placement is up to you.
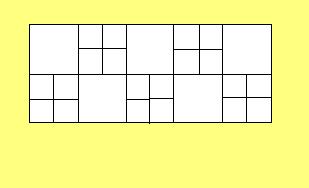 obviously you will have more squares, but MSPaint was proving
too difficult for me. so the example is a mini version.
at this point, you're probably going to want to take a break. maybe have a drink... not too stiff though, you're going to need to wield a pair of scissors for the next step. now you have to cut the seam allowances into a fringe. make your cuts roughly a half inch apart, but no ones ever going to measure them, so you are free to guess-timate. cut perpendicular to the seam but make sure you don't snip the thread itself. otherwise the quilting police will kill you. or your blocks will come apart. whatever.
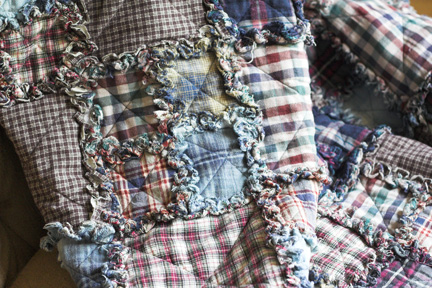
The very last step is putting your quilt in the washer/dryer to fray the fringe. this makes for a TON of lint, so i suggest taking to the laundromat if you don't think your washer can handle it.
and you end up with sometime all snuggly and worn-looking. like this.
2 comments:
I love the quilt! And I plan to make a similar-ish one soon - but with old T-shirts I have cut up...
I just unpacked this quilt!
Post a Comment