So we're going to skip that for now and go on to something else. We're going to talk about white balance. Actually, lets back up a step first and talk about why white even needs to be balanced. White is white, right? Wrong. Sunlight, fluorescent lights, and incandescent (regular) light bulbs all produce a different color of light. Natural sunlight also varies depending on the time of day and the conditions. This variance in color is referred to as the "temperature" of the light, as some light is cooler (a more blue-ish tint) and some types of light are warmer (or have a yellowish hue).
That means, that depending on what your lighting conditions are, things will appear slightly different colors. You've probably noticed that yellowish cast you sometimes get on pictures taken using indoor lighting. That's because incandescent lighting is a very yellow light. You don't notice it as much with your eyes because your brain is very adept at realizing what color things "should" be and then interpreting what it sees accordingly. The camera, on the other hand, is completely unbiased. If the lighting is yellow (or blue-ish, or green-ish) the image will have a colored tint.
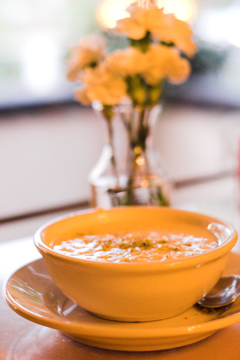
For example, this picture was taken in a restaurant with incandescent lighting. See how the white bowl looks yellowish? [ok, some clarification here... it did look yellowish. but it was underexposed. and when i fixed that, it *ahem* brought out the yellow a bit more. so now its not so much "yellowish" as it is "straight up orange"]
 Prior to Mr. Z's departure, we tried to squeeze in a meal at all
our favorite restaurants. Once he's settled in, he plans to blog about
the places we will miss most.
The key to getting rid of this tint is to tell your camera what color the light is so that it can adjust the colors of the image so that the tint is gone and white is actually white. This is done using the white balance setting. By telling the camera what the lighting situation is, the camera can adjust its coloring to make the photo look more natural.
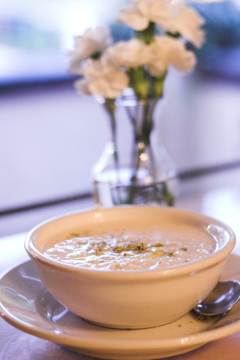
So if you tell the camera that you are indoors with incandescent lighting, it will assume that the lighting is yellow and it will cool it down, or make it more blue to compensate. For example this is the same rice pudding (delicious, by the way) but instead of leaving it on automatic white balance, i switched it to the incandescent setting (looks like a light bulb on the WB menu).
 This is just one of the photos from our most-est favorite Indian place EVER
A note about auto white balance... your pictures will probably look better than they would if you forgot and left it on the completely wrong WB setting, but its not necessarily always the best option. The camera looks at the scene as a whole and then bases its adjustments on that so if you have mixed light sources, you may still end up with a funky colored photo. In the first picture above, the background (which was the view outside the window) is actually pretty natural coloring, but the subject of the photo (my dessert) which was lit by light bulbs rather than sunlight is an unappetizing orange. by changing the setting to incandescent, the subject now looks more appetizing while the outdoor background has a bluish hue.
This is what direct sunlight looks like when shot with the various white balance settings. (You can click on it to view a larger version)
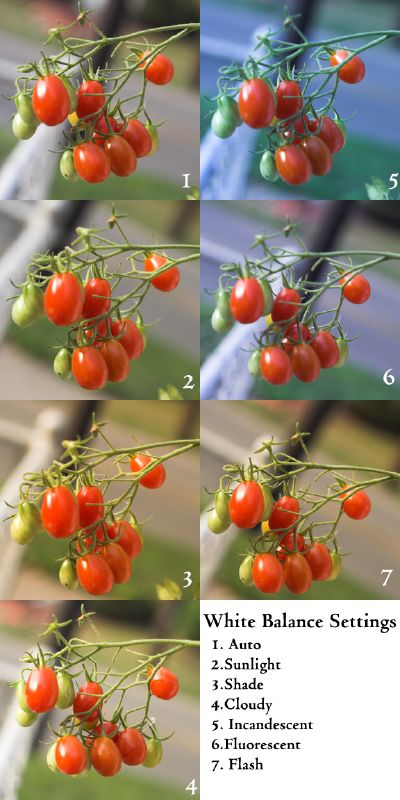
Again, the bright blue of the incandescent setting is because your camera assumes that the lighting is going to be very yellow and adjusts towards blue to compensate. However, if the light is more neutral rather than yellow, you end up with a crazy blue photograph. Hence, if you change your white balance when indoors, its important to remember to change it back when you go back outside the next time.
Just as another example, here are some more cherries. These are slightly different shots, but they were taken one after another, in the same lighting conditions. The first was on Auto WB while the second was taken using the cloudy setting.
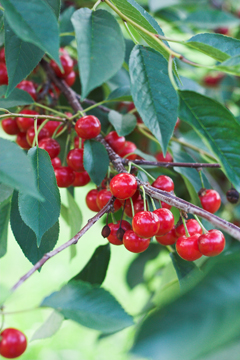
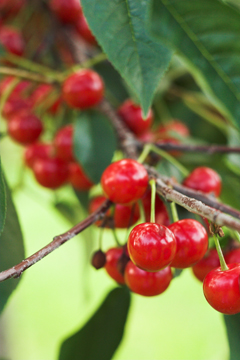
Unlike incandescent, on the cloudy setting, the camera assumes that the light will be a cooler, more blue tone, so it makes it more yellow to warm it up.
There is also a custom white balance option on most DSLR's. This can be set using what's called a gray card. I don't remember how to do it because I never do. But when using this setting, you essentially tell the camera exactly what "temperature" of light renders white as true white in a given lighting situation.
4 comments:
cool!! after i save up for my mixer, i can then start saving up for my new camera...
Returning the favor of visiting via my reader, but I enjoyed the lesson, too!
I can't find your email to send you Aunt P's email. Email me - anymommyoutthere@gmail.com.
so it seems to me that the backyard in texas is a great place to keep a bunny or two...just an observation. :)
it also looks like a good place for a god child to run rampant with two dogs and said rabbits, but avoiding the grill-thing. :) another astute observation.
Post a Comment